How To Drivelapse
Drivelapsing can be as easy or as complicated as you want to make it. For me, it started out easy, in 2009, but as the years have passed, I’ve gradually improved the quality of my videos. As a result, it’s become more complicated. But don’t be discouraged! You can make really good Drivelapse videos, very easily.
My first attempt at Drivelapsing looked like this:


It was a simple setup. I purchased a Kodak Zi6 video camera (which was pretty awesome at the time, in 2009). I mounted it on a flexible-leg mini-tripod, and covered the dashboard with a black towel to reduce reflections in the glass.
The first thing I discovered is, the camera needs two points of contact. Just putting it on a tripod is not enough — it will vibrate, no matter how well you’ve anchored the tripod to the dash. The camera also needs to touch the glass.
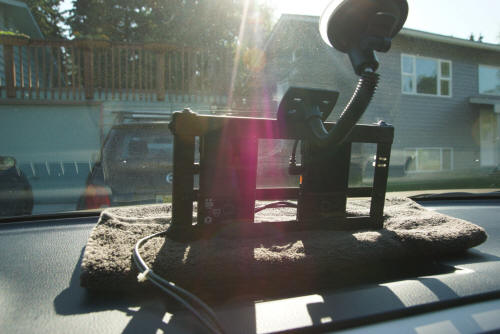
Eventually I did away with the tripod. It was too awkward to be quickly moved when leaving the car. I discovered that the camera could be easily wedged between the dash and the glass, using a suction cup on the window. The towel goes under the camera, to provide some cushion between the camera and the dash, which makes minor adjustments easier.
Over the years, I changed cameras a few times. I’m still using a Kodak video camera (two of them, actually, for redundancy), but I’m now using a PlayTouch. They aren’t being made anymore, but as of 2015, you can still buy used ones on eBay, very cheaply.


I also built a metal frame, and mounted the cameras inside it. This makes it easier to handle the cameras, when slipping them into place, or taking them down. Since my power cords (usb cables) are attached to the frame, it reduces strain on the camera’s connector socket (I had a couple of circuit boards break from strain on the wires).
So why am I using a discontinued camera? Why not use a GoPro? There are a few reasons. For one, I wanted something cheap. Since I’m using these on vacation, things happen. I didn’t want to lose an investment of hundreds of dollars. Also, a lot of the action cameras on the market today have an extra-wide angle lens, which captures the dashboard, the wipers, the air vents, and lots of reflections. A less-wide angle actually looks better to me.
The Kodak cameras also have a few other particular features that some other cameras don’t, and they’re very important to Drivelapsing. You must use a camera that…
- …records forever. Some video cameras limit clips to 30 minutes, then they stop.
- …operates off external power. Some cameras can charge off the USB port, but can only run off battery. Also be aware that some will run off USB power, but will stop recording if the power comes unplugged, or fails for just a moment before being restored. Cigarette lighter power is not 100% reliable, and your camera must be able to handle a break in power without stopping.
- …takes a memory chip. This isn’t as big a deal as it used to be. Some old “flip” cameras came with internal memory only. You’ll need a camera that can take (at least) a 32gb chip.
- …isn’t too wide-angled. It’s a personal preference, but you might not be happy with a video that shows a lot of dashboard.
When I start driving, I hit Record. If I pull over or park, I stop recording. When I start again, I hit Record again. This way, I don’t have a lot of motionless video to edit out, once I get home.
Every night, I download the day’s video onto a laptop. When the trip is over, I start editing — first assembling the different video clips into one video, then speeding it up. Most videos run at 400% to 800% speed.


In 2015, I added something new. I discovered a camera made specifically for time-lapse photography, from a company called Brinno. Instead of shooting real-time, 30-frames-per-second video, this camera shoots only a few frames per second, then creates a video file that’s already accelerated. There are advantages and disadvantages to this approach, which I’ll cover in my Review of the Brinno TLC-200 Pro camera.


The long battery life of the Brinno allowed me to experiment with roof-mounting the camera. It took some trial and error, but I think the angle from the roof is superior to a dash-mounted shot. I also added a rear-facing camera.
Mounting the camera outside the car presents a few challenges.
- It can get wet.
- It can be stolen.
- It can get plastered with bugs.
I built a weatherproof case (using food storage containers and SLR UV lens filters!) to protect against the weather, and secured the cameras with steel cables to prevent theft. Removing bugs requires vigilance! But the rear-facing camera is immune to bugs and rarely bothered by raindrops.
You don’t have to go to these extremes to shoot a good Drivelapse video — but be warned, once you get into it, you might be tempted to go all-out!


